Samsung Galaxy A57 geheime teardown: dit zit er *echte* binnen!
In deze video wordt de Samsung Galaxy A57 uitgepakt. En met uitpakken bedoelen we uit elkaar halen, tot de laatste schroef aan toe. Komt vaker voor zul je denken, maar deze teardown is toch extra bijzonder. Samsung moet de Galaxy A57 namelijk nog aankondigen.
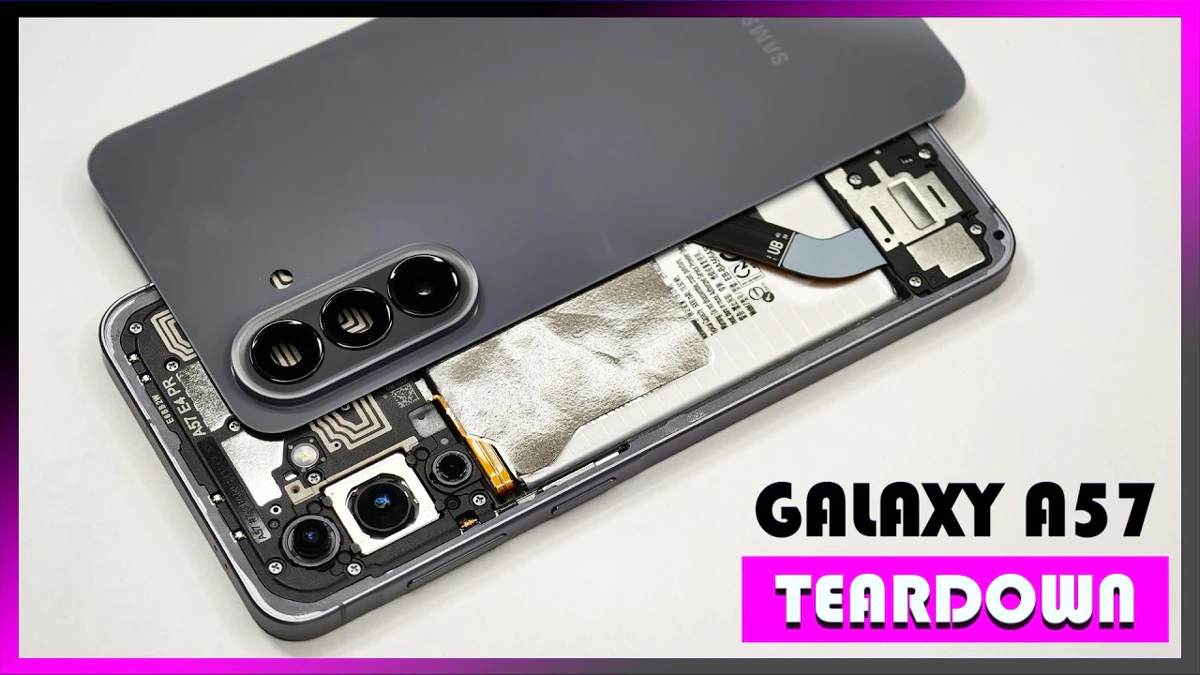
The disassembly of the Samsung Galaxy A57 5G involves removing the back plate with heat, disconnecting various components like the battery and main board, and replacing parts like the camera lens covers and fingerprint scanner. The phone features a 5000 mAh battery, a vapor chamber for cooling, and a repairability score of 9 out of 10.
Videohoofdstukken
00:00
This is the Samsung Galaxy A57 5G disassembly. If you're interested in seeing more videos like this, make sure to subscribe and click on the notification bell so you'll be notified once I upload a new video. Also, if you need any tools, there are links in the description. We'll start off by removing the SIM tray. Taking a look at that. we can see a grey rubber gasket around the opening. Now, heat needs to be applied to the back plate using either a hair dryer or a heat gun to loosen up the adhesive underneath, and then a pry tool can be used to pry the back plate off. I prefer to use a hair dryer since there's less of a chance of damaging any of the components inside by overheating them. Here's a better look at the glass backplate. The camera lens covers can be replaced by applying heat and prying them off, so you don't have to take apart the phone to replace those. There are now 18 phillips screws which need to be removed. Looking at the top motherboard cover, We can see the NFC antenna line is drawn over here, as well as another antenna line which is this light grey color line. There is also graphite film to help transfer heat. Looking at the other side, we can see the top earpiece speaker with the red rubber gasket around it. This is the bottom speaker assembly. This is the speaker itself, and the vibrator motor or haptic feedback motor is located behind the speaker, sealed inside the speaker assembly. This flex cable connects both the subboard and the screen to the main board, and this cable also connects the subboard to the main board. So when it comes to replacing the screen, just like the Galaxy S series, you have two ways you can do that. You can either just apply heat to the front of the phone where the screen is to loosen up the adhesive underneath and pry the screen off, making sure you carefully disconnect the flexible from behind the screen so you don't end up tearing it, and then reapply new adhesive and reapply the new screen, again making sure to reconnect the flexible behind the screen. However, However, that method might be a little bit more difficult. Since the flex cable length isn't long and the back of the flex cable connector is seated behind the speaker, so it relies on you pressing down the screen to connect the flex cable. So if you happen to press down the screen and not connect the flex cable properly, it will require you to pry the screen off again, which does pose a high chance of damaging a working screen. So the second way to do it would be to pry the back cover off first, remove the screws on the bottom speaker assembly and the assembly itself, at which point you can disconnect the flex cable for the screen and then heat up the front of the phone where the screen is So you can pry the screen off and reapply new adhesive. and apply the new screen, giving you the option to properly connect the flex cable behind the screen and then reassemble the phone. So moving on, we'll start off by disconnecting the battery cable and then the rest of the flex cables. There's a single phillips screw holding down the main board. Taking a look at the main board, we see the 12MP ultra-wide lens, the 15MP primary, as well as a 5MP macro lens. The main camera is the only one with OIS or optical image stabilization. The camera connectors can be disconnected by just popping them off. The LED flash is located here, and there's a secondary microphone on the top corner. Having a look at the back, we see the Proximity and Ambient light sensor, the other two connectors for the cameras, as well as a graphite or thermal pad to help transfer heat. Once that's been peeled back, we see a thermal pad on top of the processor and this chip over here. Here's a better look at the processor with the thermal pad removed. There are two phillips screws which are holding on the subboard. Looking at the subboard, we see the primary microphone located here, and there's a gray rubber gasket around the charger port. The SIM reader is located on the other side. This is the fingerprint scanner and is held down with some adhesive. To replace that, just apply some heat and gently pry it off. There's an adhesive pouch which is holding the battery down, and there are indicators on the flaps of the pouch which let you know to peel them off. This is the 5000 mAh battery. Once the adhesive pouch has been removed, We have a better look at the vapor chamber which runs underneath the battery, as well as the motherboard.
06:20
The vapor chamber is larger than that of the A56. Here's a look at them side by side. And here's the overlay between the two. The flex cable for the volume keys and power buttons located on this side. To replace that, just gently peel off the flex cable from the frame, and lift up and pull out the metal bracket from the slit of the frame. As for the buttons themselves, those can be pulled out of the frame. The 12 megapixel front facing camera is glued in place with the cure in place gasket, so if you needed to replace that you'd have to use an exacto knife or a razor blade to carefully cut the glue around the edges and then pry the camera out. Now when it comes to this phone, if you're to accidentally insert a sim ejector tool in the wrong hole, you don't need to worry since both the filters and the microphones are seated above the holes so they wouldn't get damaged. For the repairability score on this phone I give it a 9 out of 10. Now it's time to put it back together. Once everything's back in place, apply new adhesive and reapply the back cover. Flip over the foam, power it on, and you're done. I hope you enjoyed this video and I'll see you in the next one.

Video bekijken?
Om deze video van YouTube te kunnen tonen, hebben we toestemming nodig voor marketing cookies.